Setting Video and Audio Delays on Camera Sources
Welcome to the XSplit Workshop, a feature series where we provide handy tips to help you get the most out of your broadcast. This week we have put together a guide that will teach you how to set video and audio delay.
For those who prefer more visual learning, the video below will cover most of the points in this post.
USB 2.0 capture cards have built-in delay!
Some of the most popular capture cards on the market are USB 2.0 based capture cards. There are the Elgato Game Capture HD, the Hauppauge PVR series, the Roxio Game Capture HD, and the Avermedia Live Gamer Portable. These cards are great for gamers who wish to start recording or live streaming their console gameplay in high quality.
Due to the limitations of USB 2.0 bandwidth, these capture cards are forced to compress (encode) the video stream – before it is passed through the USB cable and into the computer.
This inevitably leads to a delay between the capture card feed from the real-time video feed on your gameplay monitor and when it reaches XSplit Broadcaster. To compensate for the delay, XSpit Broadcaster allows you to set the delay on secondary video and audio sources, like your web camera and microphone.
Determine the duration of the capture card delay
Before settings a delay on a source, you must find out what the delay between the capture card feed and the live feed is. Some manufacturers advertise what the delay is in the instruction manual. Otherwise, you will have to measure it manually and make fine adjustments on the fly. One useful method is using a stopwatch to time the difference between the live feed and the capture card feed. Once you’ve measured the delay, you will need to convert the number in milliseconds – that is how the delay is set in XSplit Broadcaster.
Setting the webcam delay
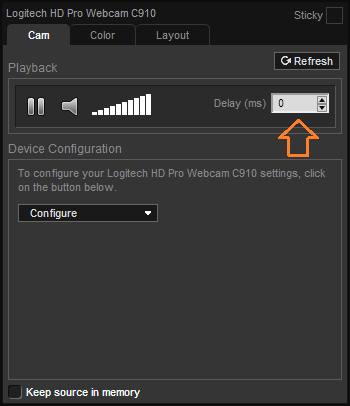
To set video delay, you need to add a video source like a webcam. After adding the webcam and is set up to your liking, right-click on the camera in the source list. On the first tab, you will see a box where you can enter the video delay for the webcam. In this box, you will enter the delay amount that you measured earlier.

Setting the mic delay
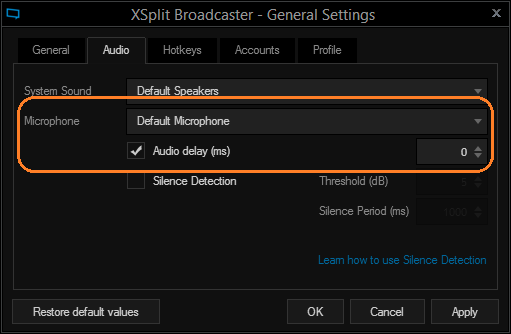
To set the audio delay, click on the Tools tab and then on the general settings option. In the audio section, mark the check box next to audio delay. From there, you can access the box to enter the audio delay time. Enter the same value as you did for your webcam video delay. Click ok to exit this window.

Test the settings
Now that you’ve set your delay, it is time to test the settings to see if they are correct. Start a local recording by going to broadcast then clicking on the local recording. Spend at least 30 seconds doing some gameplay with commentary and then stop the broadcast by once again clicking on the local recording button in the broadcast menu. You can review your local recording by clicking on the Tools tab then on my recordings option. When reviewing your recording, make sure your microphone audio and webcam audio is in sync. Please also check if these are in sync with your capture card feed. Once the settings and other customized delays are in place, then you are ready. Congratulations you are now ready to record and/or stream with your USB 2.0 capture card!
